So what’s all this tile subfloor and underlayment talk you are seeing on Facebook?
It’s about professionals protecting your investment. From its face, you see a finished tile job and your brain processes bright, shiny (or matte), clean, beautiful… rarely will one think hmmm, how is it sticking to the ground? Even if you are one that does, you may think, glue or cement, never once thinking well, what’s under the cement.
Let me answer that question!
Just like an anything you build must have a good base or foundation. In the tile trade we often find ourselves setting tile over either concrete slabs, 1 layer of plywood subfloor, or in older homes, wooden tongue and groove boards.
In this post I will address the single layer plywood subfloor.
A single builder installed plywood subfloor is suitable for carpeting only. A tile floor must be set over a sturdy base. If you stand on the carpet in your home and press down with your feet you will feel the bounce or “Deflection” in the floor. This movement will without doubt cause the tile to crack, tiles will begin to loosen and with greater deflection, tiles will crack.
Let’s discuss the issues.
Deflection: The Tile Council of America (TCA) recommends deflection be limited to L/360 (L = span length in inches) under total load for ceramic tile. The Marble Institute of America recommends that total load deflection be limited to L/720 for spans up to 14'-0” and a maximum deflection of 7/32” for spans greater than 14'-0”.
Remedy for deflection:
There are a number of remedies which you will find below. A tile professional will choose and recommend the right choice for your particular situation.
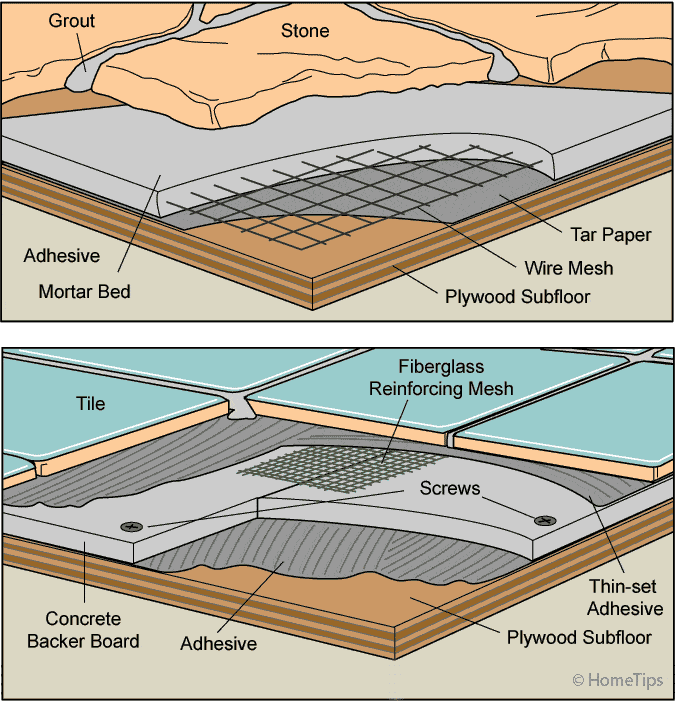
A. SCRATCH COAT
Tar paper, wire lath and skim thinset.
This is an old method we used pre-mid Eighties. It wasn’t a recommended method by the TCA but it worked well as there was only one other method, as the new technology did not exist as of yet.
B. MUD FLOOR (dry pack)
With the same materials as a scratch coat, we would make a 4:1 mix of sand and portland cement and “float” a floor of a minimum 1-1/4” thick, giving us a sturdy flat subfloor and almost zero deflection.
C. PLYWOOD
Adding an additional layer of 1/2” (we feel better using the thicker 5/8”) plywood. Any less is not recommended as it lacks integrity due to less layers or ply’s of wood. They will either buckle or delaminate.
The additional layer is installed in the opposite direction of the first layer with 3/8” gap between seams. Screwed down every 6” and 2” on the seams. Then tile is set into a latex or polymer fortified thinset. The bond will actually tear off the first ply from the rest of the board and stay bonded to the tile if you remove a tile. In addition the floor feels as strong as steel.
D. BACKERBOARD
There are a number of manufacturers using various materials or compounds make these boards. We aren’t a huge fan due to a number of reasons in the makeup and or characteristics. However, these have proven to work just as well.
E. UNCOUPLING MEMBRANE
Which is the lightest and thinest material yet giving exceptional performance which none of the others can offer this technology.
Uncoupling is a principle where the bottom of the membrane is thinset to to original subfloor, the top of the membrane has a cup, square or a shape where the thinset is held and then a thicker layer of thinset is placed over it then tiled. The engineering of these products allow for the natural movement of the original subfloor while the membrane moves independently with the tile. Thus, eliminating movement.
Now that I have briefly introduced you to these methods, I will highlight the debate in the groups about subfloor preparation and tile professionals.
So many times we all hear back from a potential tile customer that the other guy is 30%-50% cheaper. We all agree there are a number of factors why he is cheaper.
Factors include the topic in this post proper subfloor and preparation. This is the most important part of installation. So many failed jobs have a back story where the hardwood or carpet wouldn’t match up flush with the new tile floor.
The incidental tile man will use thin materials that fail to meet the 1-1/8” height minimum or none at all to get visual appeal. Often times, they will use Lauan or 1/8” plywood which is absolutely unacceptable and will cause cracking.
The professional will use the proper recommended method as per the TCA or ANSI Specs. The height difference will be made up with the use of a reducer or saddle. If you want a Major under taking the entire floor can be removed, shave the joists then do the installation. (It is expensive, and inconvenient to the homeowner, but people have done it).
Additional reasons for the price difference are (which will be discussed in future posts),
-Not using premium setting materials.
-Not using the correct setting materials.
-Not being skilled in tile installation.
-Rushing the installation as opposed to meticulously setting each tile.
-Not caring for your home, such as covering floors and cabinets and precautions to limit dust travel.
-Not being licensed or registered.
-No insurance.
Needless to say, your tile purchase is expensive and an investment in your home. A great looking tile job will bring years of beauty and enjoyment along with adding value to your home.
